Sunday, April 15, 2012

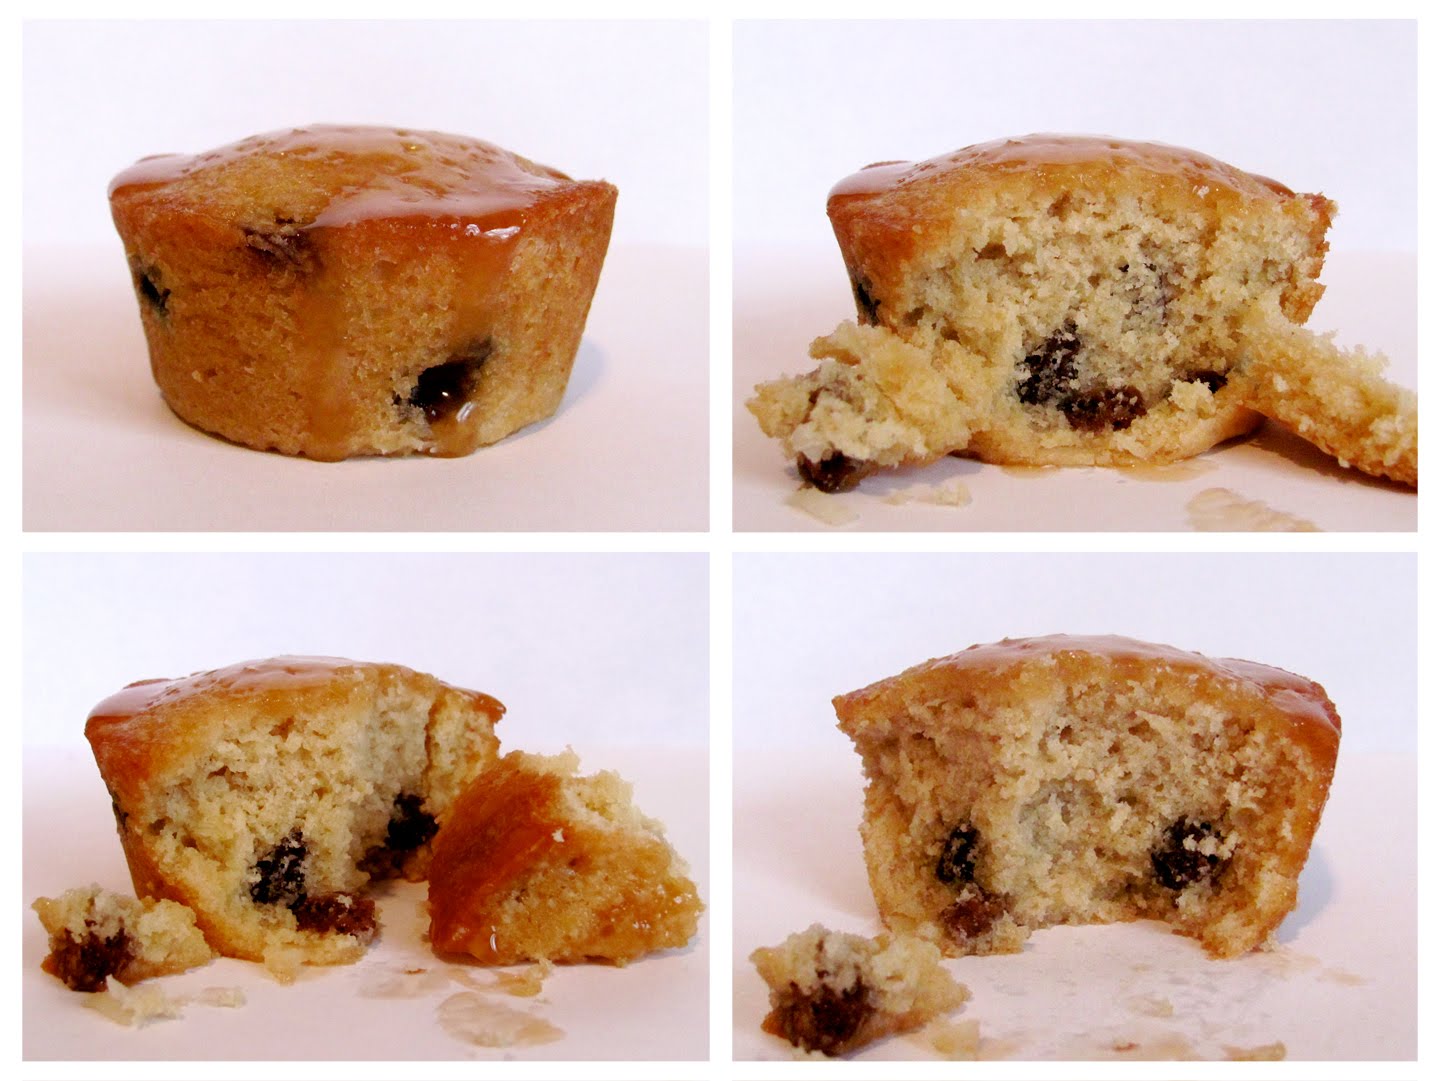
Coconut Rum-Raisin Cupcakes

If the sight of coconut rum-raisin cupcakes doesn't get your blood flowing and your juices pumping then frankly, I don't know what will. But please, try to hold yourself together. In Martha's cookbook each cupcake comes with a description. Perhaps to prepare you for what's coming or to tell you what the cupcakes are supposed to taste like in case you can't figure it out by the name of the recipe or the ingredients in it. Either way, the lovely description that comes with these cupcakes is as follows, "Drizzled with liquor-spiked caramel glaze and filled with rum-soaked raisins, these cupcakes are reminiscent of a popular ice cream flavor." Your mouth is now watering isn't it? Mine too.

I will be honest, the only thing I've ever heard involving rum raisin anything has to do with ice cream. I know 2 things about this particular flavor of ice cream. One involves a rather entertaining story about my dad that I don't quite remember all the details to, my mom could tell you. The other involves Bobby accidentally trying the ice cream on our vacation to the Dominican Republic last year when he thought what he was eating was vanilla ice cream. Honest mistake. It should be taken into consideration that the ice cream at our resort certainly couldn't hold a candle to my beloved Perry's Ice Cream (it's made outside my hometown and I miss it so much) but even so, it was not very tasty. Combine that knowledge with my dislike of coconut and I was not feeling particularly good about how these cupcakes would taste.

As you all are aware from reading about these stout cupcakes and these sticky toffee pudding cupcakes, I'm not very familiar with alcohol. And, if you haven't already figured it out from the name of these cupcakes, they required rum. Dark rum if we're being specific. Is Captain Morgan considered dark rum? I don't know, but today it was. We have nearly half a handle of Captain Morgan on top of our fridge that my dad left at our house that we never drink. Instead of buying more rum that we wouldn't drink I used the rum we already had on hand that we don't drink. Now that there's less in the bottle it at least looks like we're trying.

Nothing about this recipe was difficult, and in fact the batter pre rum, raisins and coconut was really good. Like, really, really good. As soon as I tasted it I suddenly had high hopes for the cupcakes. I thought even rum, raisins and coconut couldn't destroy this tasty concoction that I had created. I was right. Even once I had mixed in the above-mentioned ingredients the batter was still quite delicious. Things were looking good.

I filled my buttered and floured pans (someday cupcake liners will come back into my life) three-quarters full and baked the first batch for 30 total minutes with a turn halfway through the baking time. After the first batch I decided I could knock down the baking time a little bit. The cupcakes didn't turn out burnt or anything, but they were a little more golden than I thought they should be. For the remaining 2 batches I baked them for 26 total minutes with a turn halfway through the baking time, they were perfect. I tried a cupcake without the glaze and it was good. The only thing I didn't love were the raisins. I like raisins and they were fine in the cupcake, but the cake itself was so good it was almost like the raisins got in the way. In a surprising turn of events I didn't mind the coconut at all.

The rum-caramel glaze was nerve racking to make and I'm still not quite sure if it turned out exactly how it was supposed to, but it tasted good. And really, that's all the matters. I've made a glaze that required a similar process before, though I can't remember which cupcake it was for, and I always hate having to wait for the sugar-water mixture to turn color. I feel like I never know when it's reached the right hue and I should remove it from the burner. I waited until the mixture turned to what I thought was medium amber and then removed the pan from the stove. I added the rum and heavy cream. Martha was right when she warned me that this would cause the glaze to splatter. It sure did! It was like watching an experiment or something, it was actually pretty cool. But, I think I waited too long to start stirring since I ended up having some chunks of hardened glaze. However, I wasn't too worried because there was plenty of liquid glaze to use and it tasted just fine. The alcohol wasn't even noticeable in the glaze, or in the cupcakes for that matter. If I didn't now it was there, I wouldn't have known it was there.

Sunday, April 8, 2012

Chocolate-Spice Cupcakes

Hoppy Easter! Get it? Hoppy... like a bunny? My brother texted me that this morning and I thought it was clever. In honor of the holiday I suppose I should have made something better suited for the occasion, but I didn't. Well, that's not entirely true. I made "bunny bait" for my future in-laws a couple days ago (my parents get flowers, Dad really loves them) and shipped it to them so they'd have it in time for the holiday, but I didn't document it. Forgive me. Hope you enjoy the holiday in whatever way you choose to celebrate it, along with these chocolate-spice cupcakes (no link on Martha's site... I'm sensing a theme).

I was looking forward to these cupcakes because I haven't made anything chocolate in awhile and people like chocolate. So, when I took these to work I knew people would eat them. People are skeptical when you say you have chai-tea mini cupcakes. People are less skeptical when you say you have chocolate cupcakes. Human nature I suppose. But, the more cupcakes I can get rid of, the less I eat. Everyone wins. The only thing I wasn't really excited about when it came to these cupcakes was having to butter and flour the pan. Only this time instead of using flour I had to use cocoa powder. Wanna know what really makes a mess? Lining a cupcake pan with butter and then dusting it with cocoa powder.

Making the batter was easy, however messy, or perhaps splattery would be a better term. I didn't enjoy that part very much. Because I have a high-powered hand mixer (even when it's on the lowest setting) I know that certain things are going to make a mess. For instance, for the last couple recipes I've made, small pieces of butter and brown sugar have flown about when I mix them. But, they're for the most part solid substances so it's not so much of a mess. However, once I had mixed the butter, brown sugar and egg I added the molasses and water combined with baking soda to the bowl and as soon as I realized the consistency of what I had, I knew I was in trouble and there wasn't any way to avoid it. So, I did my best to put my arm around the bowl to try to hold in as much liquid as possible. Thankfully my t-shirt took the brunt of the mess and the walls, countertop and items sitting on the counter were left fairly unscathed. I don't enjoy cleaning up messes so I try to keep them as contained as possible.

Since the recipe told me I would only get 12 cupcakes from the batch I only buttered and cocoa powdered one cupcake pan. If I had a significant amount of batter left over I was just going to use liners for the rest. I really don't like making cupcakes without liners, it makes such a mess. The recipe said to fill the pans halfway. Confession. I filled them more than halfway. Again, since I was only supposed to get 12 cupcakes I figured using all of the batter on one batch would be okay. It was okay, but most of the cupcakes ended up being bigger than I wanted them to be, and some were a pain to get out of the pan after they were baked. Next time around I would probably not force all the batter into one batch. Had I not this time, I probably would have gotten around 14 cupcakes. The cupcakes were baked for 20 total minutes with a turn halfway through the baking time. I let them cool for 15 minutes in the pans and then removed them and let them cool on the wire racks while I made the ganache.

I have made this chocolate ganache glaze many times, but this time I was extra careful to very finely chop the semisweet chocolate because I didn't want any lumps in my glaze. Last time I made it I had some small lumps. While it was fine, I didn't like the look of the lumps. I wanted it to be silky smooth this time, and it was. Success! I spooned the glaze over the top of each cupcake and let it set.

The only thing left to do was add the candied ginger garnish. Does anyone need any candied ginger? If you do, I'm your girl. I have a ton of it. I knew candied ginger would be the hardest thing to find at the grocery store, but I was able to find it. Of course it was in a decent sized tupperware (like the size of a tub of I Can't Believe It's Not Butter), cost $4.79 and was labeled as crystalized ginger so I may have bought the wrong thing. I don't really know. But it looked right. The worst part is I only used the garnish for one cupcake, the one in the photo above. I didn't want to garnish all the cupcakes because I didn't want anyone at work to be scared away by the ginger garnish. My mission is to always get rid of the treats so I don't eat them. And in my rule book, as long as I make at least 1 cupcake from the batch exactly how the recipe says I have successfully completed said cupcake. I did that in this instance therefore, in my eyes, I successfully conquered these cupcakes.

I was also told by a coworker or 2 that these were the best cupcakes they've ever had. Now, that is a very lovely compliment, but I'm not quite sure if I believe that it's true. As a lover of cupcakes, this was not the best cupcake I've ever had. Even though I made it I can still be objective. Though I suppose everyone has different preferences when it comes to cupcakes. It was quite yummy, but not the best. I'd say that maybe the cupcake I'll be making next week has the potential to be the best. But, between you and me, I looked ahead to see what it is, and there's pretty much no way that's going to happen. And just to keep you in suspense and to keep you coming back for more... I'm not going to tell you what it is!


Sunday, April 1, 2012

Chai-Tea Mini Cupcakes

I like tea. I might like chai tea if I actually knew what it is. I've seen it on the Starbucks menu on the rare occasion that I'm in a Starbucks. I'm not a coffee drinker and don't frequent places like Starbucks because I find them intimidating, there isn't anything on their menu that interests me (unless we're talking about desserts which I don't need) and I don't see the point in spending $4 or more on something I can get at home or at work for free. Call me crazy. After making chai-tea mini cupcakes (no recipe on Martha's website) I'm still not sure that I know what chai tea is, but my guess is something like black tea infused with milk, or maybe just black tea. Or maybe none of the above. Who knows.

Because I didn't (and still don't) know what chai tea is before I made these cupcakes I wasn't confident that I would like them and therefore I wasn't really looking forward to making them. But, the nice thing about this recipe was that I had pretty much everything I needed on hand other than black tea bags and sweetened condensed milk. Martha suggested the type of tea to get, Ceylon, but I just looked for the cheapest black tea I could find. We have a Keurig so we don't really use tea bags much anymore and Bobby is more of the tea drinker in the house, and he doesn't like black tea. So, I found a box of black tea bags for $1.25, used the 2 I needed and took the rest to work and left them in the mini cafe. Someone is bound to use them.

First order of business was steeping the tea. While the milk simmered and then steeped with the tea bags in it I combined all the dry ingredients and wet ingredients separately, and lined my mini cupcake pans with mini cupcake liners. Another recipe that didn't require me to butter and flour pans, I'm on board. Once the tea had steeped and cooled I combined everything together. The batter wasn't a pourable consistency so I used a tablespoon to fill each of the liners. The recipe said I would get 46 cupcakes but I would say I got around 36 or so. I may have filled the liners fuller than I needed to (Martha said three-quarters full) but the cupcakes all came out a good size, not too big, nice and rounded just like I like them. So, I was fine with it.

The recipe said to bake the cupcakes for 10-12 minutes and turning the pan once halfway through the baking time. Because you can't unbake something I started with 10 total minutes of baking time for the first batch. This ended up not being enough time so I added 2 minutes to the first batch and baked the second for 12 total minutes from the start. Perfection. The cupcakes cooled in the pans on a wire rack and then on a wire rack by themselves while I debated in my head about whether or not I wanted to ice them that day, or wait until the next day.

Eventually I decided to just make all my mess at once and get everything done. After all, the condensed-milk icing wasn't very difficult to make. It also yielded way more icing than I needed for the amount of cupcakes I had. Even if I had gotten 46 cupcakes from the recipe I still would have had more than I needed. It may have been that I didn't use enough icing on them, but I certainly wasn't stingy. I dipped the top of each cupcake into the icing and then placed them back on the wire racks so the icing could set. Of course I taste tested throughout the process and at no point did the cupcakes taste like tea. They just tasted like another variation of a spice cake which I very much enjoyed. Probably a little too much since I ended up eating way more than I wanted to. They're just such a perfect size for snacking, you forget how many you're eating. Good thing I had run 5 miles earlier in the day to balance it all out. Shedding for the wedding is going strong! Minus my mini cupcake episode of course. Shh... don't tell.

Sunday, March 25, 2012

Stout Cupcakes

Are you sensing a theme? I know I am. What theme do you ask? Alcohol, that's what. The sticky toffee pudding cupcakes I made last week required brandy. The stout cupcakes (no recipe on Martha's site) this week required beer. Since last week's cupcakes turned out so well I was slightly optimistic that I would like these cupcakes. However, if I was a frequent drinker of alcohol, beer would not be my first choice, and since these cupcakes contained beer, I wasn't overflowing with hope.

My level of knowledge when it comes to beer is just slightly superior to my knowledge of liquor, so it is fair to say that I don't know much. Thankfully, the recipe suggested that Guinness would be a good choice for these cupcakes, so Guinness is what I chose. It of course had to be the most expensive choice. Then again, only the best will do. True story, I once made penne a la vodka with Grey Goose. Call me crazy (it's okay, my entire family did when I told them), but it was the only vodka we had in the house! Plus it was a gift and roughly 1 year and some odd months later it's still in the freezer. Anyway, back to the beer... I (Bobby, since he was funding this particular grocery trip) bought a 6-pack of Guinness. I only needed about 1 1/2 bottles. So if you're thirsty we've got some in the fridge for you. Right next to the Grey Goose.

While I am an alcohol novice I do know that there is a special way you're supposed to poor Guinness (right?), and I think it's supposed to settle a little bit too before you drink it. I could be wrong. Either way, the first thing I did before working on any other portion of the recipe was pour the beer into a glass so it could settle. While the Guinness did its thing I combined the dry ingredients. I also zested an orange so I wouldn't have to do that later. After all the dry ingredients were combined I put all the wet ingredients together in a large bowl. In the midst of doing this I came upon a moment of uncertainty. While measuring the amount of beer that I would need (1 1/4 cups) I wasn't sure if I should measure from the top of the foam or the bottom. I decided not to count the foam and measured 1 1/4 cups of beer sans foam. This may or may not have been the right decision. Once all the ingredients were in the bowl I turned on my hand mixer and proceeded to make a mess. There were so many liquid ingredients I knew I was going to have a bit of a sloshy mess when it came time to use my hand mixer and I was right. I did my best to contain it and a majority of the splatter landed on my t-shirt (not a problem since I was wearing gym clothes) and not on the walls or countertop. Win. I combined the wet and dry ingredients with my hand mixer and had myself Pyrex-pourable cupcake batter!

The only thing better than Pyrex-pourable batter is not having to butter and flour cupcake pans. I have finally come to another recipe in this section that allowed me to use cupcake liners. How I've missed them so. A little sneak preview for you... I get to use them next week too. Hooray! I filled the cupcake liners three-quarters full and had myself 28 cupcakes, just like the recipe said I would. The cupcakes baked for 20 total minutes with a turn halfway through the baking time. They were perfectly baked.

The stout glaze for these cupcakes was very simple, it only had 2 ingredients. Confectioner's sugar and you guessed it... more Guinness! 2 things that just came to me... I feel like I should have made these last week for St. Patrick's Day. And, when I took Rollins to the vet this week (nothing to worry about, just a couple booster shots for the standard doggy vaccines) there was another dog there named Guinness, and he was brown. I digress. Back to the glaze. It was very easy to make, but I was a little concerned that it was going to taste too much like Guinness for my preference. Crisis averted. It didn't really taste anything like Guinness. I know what Guinness tastes like because I tried it while making the cupcakes. It is not good. How people willingly drink it I'm not sure I'll ever understand. While I didn't enjoy the Guinness itself, I did enjoy the cupcakes. They're reminiscent of a spike cake, or molasses-type baked good. Right up my alley.

Sunday, March 18, 2012

Sticky Toffee Pudding Cupcakes

I get the sticky part. I get the toffee part. I get the cupcake part. But, I don't get the pudding part of these sticky pudding toffee cupcakes (please note this recipe isn't the one that's in the cookbook, but it's as close as I could find). Maybe after we're done here, you'll be able to tell me.

When I read through the recipe and the ingredients I would need, 2 things immediately jumped out at me. One, I once again had to deal with dates. And two, I needed to buy some booze as the recipe requires brandy. I suppose the timing is rather appropriate since St. Patrick's Day was yesterday. But along with not being a drinker, I'm also not Irish. 2 strikes against me already. Anyway, from the few trips I've made to the liquor store (Crazy Bruce's is my store of choice if you're in the Connecticut area) I know that they keep the airplane-sized bottles of liquor near the registers and I knew I would probably need just a couple nips of brandy since the recipe only required three-quarter cups of it. It took awhile to find, apparently brandy isn't a very popular liquor, but again, I wouldn't really know. I found what I needed and purchased 3 bottles. Mission accomplished. The only other thing I had to buy was dates. I did have some left over from the time I made these date-nut mini cupcakes but not knowing much about dates I was worried they would be stale, or bad, or whatever you call dates that are no longer usable. So I threw the old ones out and bought new. Just in case you were wondering, dates still look just as creepy and slug-like as they did the first time I baked with them. So gross.

I'm starting to get the impression that just about every cupcake in this section is going to require me to butter and flour the cupcake pans, which we've already established as being one of my least favorite things. This recipe was no different. Because I don't like to do it, I got that out of the way first. My next step was to chop the dates in half. I made it a priority to purchase dates that had already been pitted to save myself some work, and from having to touch the dates any more than necessary. Once the dates were cut I cooked them down in the brandy and water and prepared the dry ingredients for the batter. The worst part of this whole recipe was the smell that came from the water, brandy and dates while they were cooking. Even with the lid on the pot while they boiled, when I caught a whiff of the smell it was extremely unpleasant. So much so that I held my breath when I was in the area where the steam was coming out of the pot. Yes, it was that bad. Or yes, I'm that much of a baby. You can be the judge.

The dates didn't take that long to cook and when they were "very soft" I was supposed to puree them in the food processor until smooth. Since the mixture was pretty liquidy (technical term) I thought the blender might be a better idea. But, if Martha said I should use a food processor then I was going to use a food processor. It didn't take long for the mixture to become smooth, or to become what I decided was smooth enough. When the date mixture was smooth enough I let it cool for 15 minutes.

While the dates cooled I combined the rest of the ingredients which was almost no work at all. Once the date mixture was cool enough I combined that, and the dry ingredients with the rest of the wet ingredients. Everything came together nicely, but the batter was pretty thick and there was no way I was going to be able to pour it into the cupcake pan. Since the recipe said I would only get 14 cupcakes I decided to use all the batter for one batch and get 12 instead. I didn't want to have to butter and flour another pan for only 2 cupcakes.

I used all the batter to fill the pans which filled each of them about three-quarters full. They were baked for 24 total minutes with a turn halfway through the baking time. The cupcakes were a little big for my liking, but not too bad. While the cupcakes were baking I made the toffee glaze (this isn't the exact recipe from the cookbook either, but it's close). Since it had to be poured into the cupcake pan as soon as the cupcakes were done baking and used immediately after it was made I was feeling the pressure to get the timing just right. The glaze was easy to make even though I put all the ingredients in at once instead of waiting to put in the brandy and salt (oops!). That's what happens when you don't read the directions all the way through. Still haven't learned that lesson, but it didn't matter anyway. I ended up finishing the glaze a couple minutes before the cupcakes were done. I just gave it a couple stirs before I poured it into the well of each cupcake.

Before pouring in the glaze I was worried that the cupcakes were going to stick to the pan because they were still going to be pretty warm, but to my pleasant surprise they all came out quite nicely. I was able to tilt each of them up enough to pour in 2 tablespoons of the glaze for each cupcake. Once each cupcake received it's dose of the glaze I let them sit for 10 minutes to soak it all in before removing them from the pan and applying the next dose of glaze.

When it was time to remove the cupcakes from the pan almost all of them came out nicely. Parts of some of the bottoms were stuck in the pan, but it wasn't enough to be upsetting. It was enough to eat. After all the cupcakes were removed I applied 2 more tablespoons of glaze to each and let it set until finally it was time to taste test. My favorite. They were delicious. I loved them, and they're definitely my favorite from this section so far. I especially knew they were good because after I was finished photographing one I gave the rest to Bobby so he could try it. Normally he takes a bite and gives it back to me, but this time he ate the whole thing. Then he told me to start giving them away so he wouldn't eat anymore. He's shedding for the wedding too.

Sunday, March 11, 2012

Mrs. Kostyra's Spice Cupcakes

Are you wondering who Mrs. Kostyra is? Me too. Turns out Mrs. Kostyra is Martha Stewart's mother, and this cupcake recipe is adapted from one of her recipes. See what reading more than just the recipe in a cookbook can teach you? It can also teach you that Martha's mother's first name was... you guessed it... Martha. I don't know why, but I always find it interesting when daughters are named after their mothers. I digress.

The only thing I didn't have for this recipe on hand was ground mace. Now I have a tiny jar of it that I'll probably never use again that cost me $7. Spices are so expensive. I had intended to make these cupcakes much earlier in the week than I actually did so I remembered to leave out both the butter and the eggs to get to room temperature. I didn't remember to leave out the milk, but I feel like that would have been a little gross anyway. So before I started making the batter I measured out the amount of milk I would need and let it sit on the counter while I did everything else. I figure it got close enough to room temperature, how much difference can it really make anyway?

First thing I got out of the way was buttering and flouring the cupcake pans. This has to be my least favorite thing. It's a messy process the whole way through. I make a mess while flouring the pans, and then I have a mess to clean up after the cupcakes are done and have been removed from the pans. Why can't we just use liners all the time? It makes cleanup so much easier. I like easy and I hate washing a bunch of dishes.

After the pans were taken care of I "sifted" together the dry ingredients. Let me be honest, I didn't sift together anything. I used my whisk, like I always do to combine the dry ingredients. I don't have the necessary tools (or patience) to sift the dry ingredients 3 times. Until someone tells me that process is absolutely necessary, I'm not going to do it. I think my whisk gets the job done just as well and everything was sufficiently combined.

With the dry ingredients successfully "sifted together 3 times" I prepared the rest of the batter which wasn't much work. I did have to microwave the butter for about 5 seconds so it was soft enough to mix with the brown sugar. Sometimes, even after leaving the butter out to get to room temperature it doesn't quite get there. Especially when you leave it out in the kitchen and that's the coldest room in your house. Oh well.

With everything combined the batter was a pretty liquid consistency, but I didn't think it was quite liquid enough to pour into the pans so I used my old standby... the tablespoon. I filled each three-quarters full and had enough batter for 24 cupcakes and then some. Since I didn't want to have to wait for the pans to cool, then remove the cupcakes, then re-butter and re-flour the pans to use the rest of the batter I decided to whip out my mini cupcake pan (and mini cupcake liners) and make mini cupcakes with the remaining batter. I had enough batter for 8 mini cupcakes plus the 24 regular-sized ones that I already had. I was particularly excited about this because then I could carry out my taste test with a mini cupcake and save myself a couple calories. It's amazing when everything comes together.

Once the cupcakes were baked for 20 total minutes with a turn halfway through (10 total minutes for the mini cupcakes with a turn halfway through) and then cooled completely I removed them from the pans and placed them on a cooling rack so I could glaze them. The citrus glaze is one that I have made before for these triple-citrus cupcakes only this time I used orange juice and orange zest. But again, it was not complicated. Although, I can't quite figure out why Martha's glaze always looks perfectly white in her pictures and mine dries almost clear. She must take her pictures before the glaze sets. Or maybe she uses more confectioner's sugar so it's not as thin. I'll have to remember to ask her sometime. Maybe she'll share her secrets. To glaze the cupcakes I just spooned some glaze over the top and let it set. I put a piece of wax paper on a cookie sheet underneath the wire cooling rack to help contain the drippage (technical term) so I wouldn't have a huge mess. It worked.

Because I was enacting my taste test with a mini cupcakes I actually dipped the whole top of the cupcake in the glaze. I figured since it was smaller I could allow myself a little more glaze and a couple extra calories, right? I really liked the completed cupcake. They were good by themselves, but the glaze really added another nice flavor/component. I bet you're thinking, "My, with that language it sounds like she's been watching some Top Chef." You're right!

Sunday, March 4, 2012

Apricot-Glazed Black and White Cheesecakes

As a kid I hated cheesecake (calm down), but it was, and still is (along with blueberry anything) one of my dad's favorite desserts. It was often found at our house, or my grandparents around the holidays. Each year I would try it again, and each year I would take one bite and that was it. At some point my taste buds changed, or I finally came to my senses and realized what I had been missing all that time. While I enjoy cheesecake from time to time these days, at the moment I have 15 apricot-glazed black and white cheesecakes (no link, or anything remotely close on Martha's website) on my hands that I'm not willing to eat all by myself. Due to the wedding now being 6 months away (yikes!) and my current shedding for the wedding extravaganza being in full force I need to unload these bad boys. Any takers?

My favorite part of cheesecake is the graham cracker crust. I could honestly eat just that straight from a bowl, but I don't because I would judge myself the entire time. These cheesecakes however were to have a chocolate cookie crust... works for me! Martha suggested using Nabisco Famous Wafers for the crust, so that is what I set out to find at the grocery store. I have looked for these before for some other recipe and couldn't find them. I was afraid that was going to be the case again. I was standing in the cookie aisle looking up and down and getting frustrated because I couldn't find what I wanted. I was seriously thinking about buying Oreos or some other creme-filled cookie and just splitting them, scraping off the creme and then crumbling the cookies to make the crust. Yes, it would have been a lot of work, but I needed a crust.

Finally, a light shone down from the heavens and there they were, hiding from me on the top shelf in a skinny little package. And, with a stroke of luck they were even on sale! It was a great day. I knew I needed three-quarters of a cup of crumbs, and I wasn't sure how many cookies that would take. I stood for awhile deciding it I should get 2 packages of cookies because I didn't want to get started and not have enough. But even on sale, the cookies were almost $4 per box and I'm on a strict wedding budget. I got one package and kept my fingers crossed that it would be enough. As I sit here writing this, and snacking on the extra cookies I can tell you one package was enough. I only needed about half the package to get the amount of crumbs I needed.

First, I crumbled the cookies using my food processor. It is an annoying cleanup, but it's much more efficient than putting the cookies in a Ziploc bag and crushing them with a rolling pin. And since I was feeling lazy I just put the processor parts in the dishwasher after I was done. That's what it's for, right? I started to melt the butter for the crust in the microwave. I put it in for 30 seconds and then stopped halfway through to give it a swirl. Of course when I grabbed the dish it was in it was extremely hot and burnt my fingers. I couldn't believe the dish had gotten that hot in only 15 seconds. After I cursed and ran my fingers under some cold water I decided it would be better to just melt the butter in a pan on the stove. That way I wouldn't burn the butter, or any more of my fingers. It took a little longer, but it was the right way to go. I firmly pressed 1 tablespoon of the crust mixture into each cupcake liner. I ended up with enough crumbs for 16 cupcakes and I baked them each for 7 minutes with a turn halfway through.

While the crusts were baking and cooling I worked on the batter. I had remembered to let the cream cheese sit out overnight so it was room temperature and easy to mix. Other than almost forgetting to add the vanilla, everything came together well. The batter was just liquidy (technical term) enough for me to use my Pyrex measuring cup to pour it into the cupcake pan. I filled the liners as full as I could because that's what Martha said I should do, and baked each for 22 minutes with a turn halfway through the baking time.

Once the cupcakes were done I let them cool completely on the counter in the tins and then refrigerated them (while still in the tins) overnight. The following morning I worked on the apricot glaze, which wasn't really much work at all. Martha said that I should use apricot jam. Stop and Shop had apricot preserves. Whether or not they're the same thing I don't really know, but in the end the preserves worked. I heated the preserves until it was "loose" which to me just meant smooth, and I put it through a sieve so there weren't any chunks. I used my teaspoon and put a dollop of the glaze on each of the cheesecakes. Once the cheesecakes were dolloped (another technical term) they reminded me of a perfectly cracked egg, with the apricot glaze being the yolk. I think they would be really cute for an Easter dessert. I also think the apricot glaze could be swapped out for raspberry, strawberry or even blueberry (my dad would love those!) which is something I would probably like better as well. I didn't hate the apricot glaze though. It was quite good, as were my perfectly sized little cheesecakes. They are portion control at it's finest, right up my alley!